OAuth 2.0 with Managed Identities
Using Managed Identities to access an OAuth 2.0 protected application is a best practice for an application to application communication or, as referred to in the OAuth 2.0 terminology - Client Credentials Grant Flow. This article will show you how to configure your application in Azure AD and use Managed Identity to access the application.
The Microsoft identity platform (Azure Active Directory) offers authentication and authorization services using standards-compliant implementations of OAuth 2.0 and OpenID Connect (OIDC) 1.0. You can use Azure Active Directory to build an authentication and authorization layer for your application. There are multiple OAuth 2.0 flows implementation, mainly depending on the type of the client application. The Client Credentials Flow is the best fit when it comes to service-to-service communication.
OAuth 2.0 Client Credentials Grant Flow permits a web service (serving the role of a confidential client) to use its credentials to authenticate when calling another web service instead of impersonating a user. In this scenario, the client is typically a middle-tier web service, a daemon service, or a website:
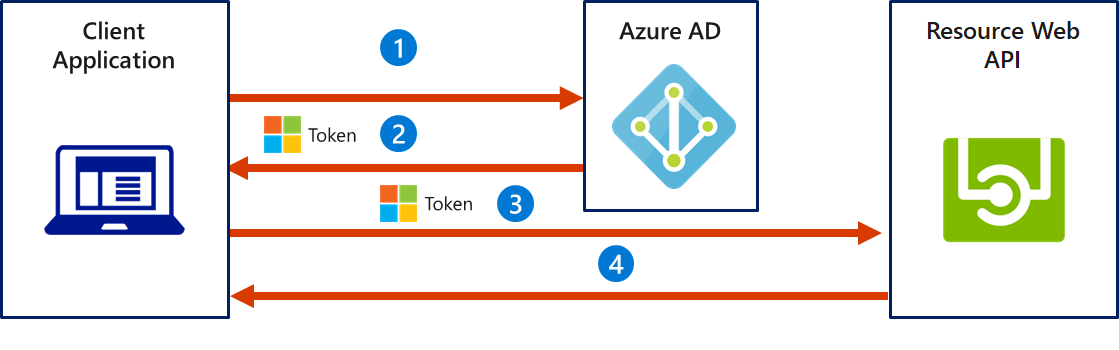
- The client application authenticates to the Azure AD token issuance endpoint and requests an access token.
- The Azure AD token issuance endpoint issues the access token.
- The access token is used to authenticate to the secured resource.
- Data from the secured resource is returned to the client application.
Authentication is performed using the OpenId Connect protocol on top of OAuth2. The client uses a service principal with a secret or certificate to authenticate to Azure AD. A recommended approach for the clients is to use Managed Identities:
- Eliminate the need for users having to manage credentials
- Non exportable certificate-based credentials, valid for 90 days, rolled after 45 days
- Uses long-lived tokens (24 hours) with a proactive token refresh every 12 hours (it can handle a maximum Azure AD downtime between 12-24 hours)
To register your application in Azure AD, you need to:
- Create a manifest.json file that describes the roles your service support. Based on the provided role in the token, you can perform Role Base Access Control in your service:
cat > manifest.json << ENDOFFILE [{ "allowedMemberTypes": [ "Application" ], "description": "Consumers can use the service", "displayName": "Consumer", "isEnabled": "true", "value": "consumer" }] ENDOFFILE - Register an application in Azure AD that represents your service:
# Register an application in Azure AD appId=$(az ad app create --display-name aztoso-com-app \ --identifier-uris https://myapp.aztoso.com --app-roles @manifest.json --query appId) # Install the application in the local Azure AD - by creating a service principal az ad sp create --id $appId - Assign a role to the User Managed Identity client will use to connect to your service:
 #Object ID of your application registered in Azure AD
 appId="<YOUR_APPPLICATION_ID_HERE>"
 # ObjectId of the Managed Identity used by the client
 managedIdentityObjectId="<OBJECT_ID_OF_MANAGED_IDENTITY>"
 # Role you want to assign
 role="consumer"

 # Get the application role id
 appRoleId=$(az ad app show --id $appId --query appRoles[?appRoles.value==$role].id -o tsv)
 # Application's service principal id
 spObjectId=$(az ad sp show --id $appId --query objectId -o tsv)
 # Create the body for the Graph API call
 cat > body.json << ENDOFFILE
 {
 "principalId": "${managedIdentityObjectId}",
 "resourceId": "${spObjectId}",
 "appRoleId": "${appRoleId}"
 }
 ENDOFFILE
 # Assign the role to the managed identity
 az rest --method POST --uri "https://graph.microsoft.com/v1.0/servicePrincipals/$managedIdentityObjectId/appRoleAssignedTo" \
     --headers 'Content-Type=application/json' --body @body.json
After assigning the necessary role to the Managed Identity, the client can get the token from the Azure Instance Metadata Service and use the token to access your service:
curl 'http://169.254.169.254/metadata/identity/oauth2/token?api-version=2018-02-01&resource=https%3A%2F%2Fmyapp.aztoso.com' \
    -H Metadata:true -s | jq -r .access_token
The issued token contains claims that you can use to authorize clients to your service:
- aud - Identifies the intended recipient of the token. Your service should validate this value, and reject the token if the value does not match.
- iss - Identifies the security token service (STS) that constructs and returns the token, and the Azure AD tenant in which the user was authenticated. Your service should use the GUID portion of the claim to restrict the set of tenants that can sign in to the app.
- appid - The application ID of the client using the token. Your service should use appid or oid to identify the client that connects to your service.
- oid - The immutable identifier for an object in the Microsoft identity system - the Object (principal) ID. Your service should use appid or oid to identify the client that connects to your service.
- roles - The set of permissions exposed by your application that the requesting application has been given permission to call. If implementing RBAC, your service should validate the roles of the calling client.