Run Linux containers on Windows 10 using WSL 2
What is Windows Subsystem for Linux (WSL)?
The Windows Subsystem for Linux lets you run a Linux environment on Windows, without creating a virtual machine. WSL 2 is the latest version of the Windows Subsystem for Linux, generally available in Windows 10, version 2004 (May 2020). One of the main improvements over version 1 is the usage of full Linux kernel, specially tuned for WSL 2, optimizing for size and performance to provide a fantastic Linux experience on Windows. More information of WSL is available in the Microsoft docs
Windows Terminal
Windows Terminal is an excellent terminal application that you can use to access, for example, command prompt, Powershell, Cloud Shell, and WSL. You can use multiple tabs, panes, set a background, customize colors, create your shortcut keys, and much more. Visit the official documentation page to learn more about this very powerful tool.
Install WSL 2 and Docker Desktop
To be able to run containers under WSL 2, you need to install a Docker Desktop. There are four pre-requirements before installing the Docker Desktop:
- You need Windows 10, version 2004 (May 2020 update)
- Enabled WSL 2 feature in Windows 10
- The Linux kernel upgrade package for WSL 2
- Linux distribution up and running under WSL 2
In the Microsoft official documentation, you can find instructions on how to enable the WSL feature, upgrade WSL version 1 to version 2 and how to install your favorite distro under WSL. After satisfying the pre-requirements, download the latest Docker Desktop installation package and start the installation process. When prompted, choose to use the WSL 2 based engine.
Run a container
Using Windows Terminal or the Linux distribution shortcut from the Start menu, open the console connection to your Linux distribution running under WSL.
- Check if docker command is accessible via the Linux distribution
docker --versionIf the above command displays the docker version, proceed with step 2. Otherwise, restart the computer if you didn’t restart it after the Docker Desktop installation.
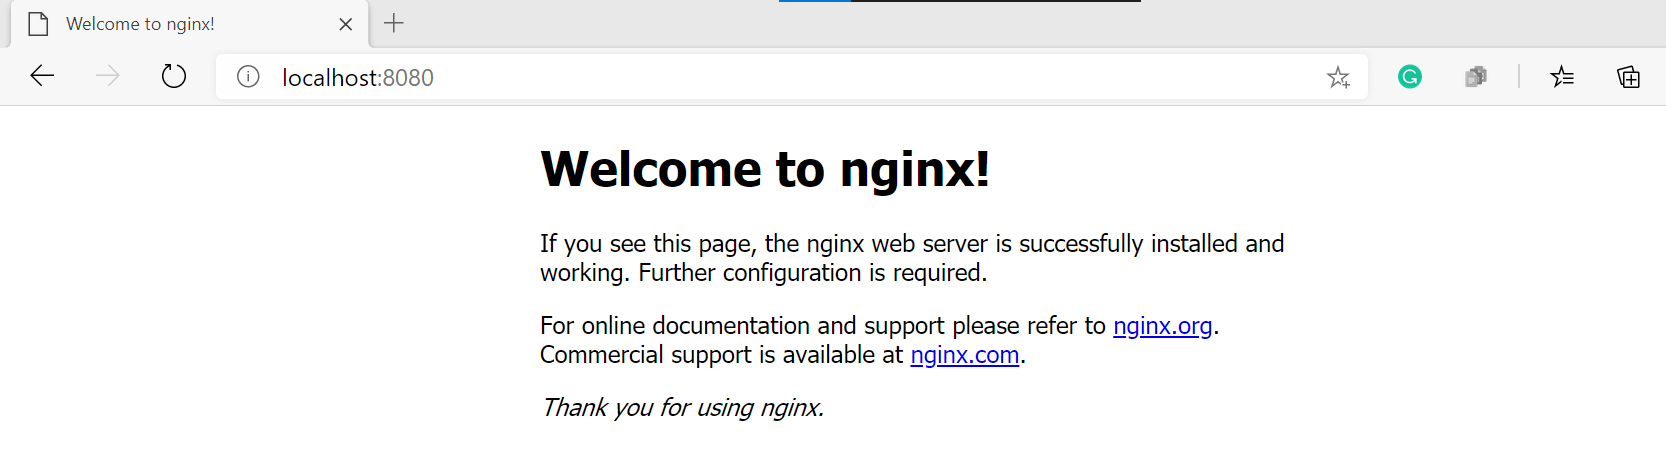
- Start a Nginx container
docker run --name nginx-demo -p 8080:80 -d nginxThis command will download the latest Nginx container from the public repository, run the container and map the localhost port 8080 with the container port 80.
- Open your favorite web browser and navigate to http://localhost:8080. You will see the Wellcome to nginx! page
Cleanup the resources
To delete the running container and downloaded Nginx image, follow these steps:
- Stop the running Nginx container
docker stop nginx-demo - Delete the container
docker rm nginx-demo - Delete the Nginx image
docker rmi nginx