Protect your APIs with Azure API Management - part 2 (OAuth 2.0)
Options for protecting backend APIs with Azure API Management (APIM)
When you publish APIs through API Management, it’s easy and common to secure access to those APIs by using subscription keys. Developers who need to consume the published APIs must include a valid subscription key in HTTP requests when they make calls to those APIs. The APIM is doing the authorization, and you just need to enable the “Requires subscription” at the product or API level.
The second option is to use client certificates. You can use certificates to provide TLS authentication between the client and the API gateway and configure the API Management gateway to allow only requests with certificates containing a specific thumbprint. The authorization at the gateway level is handled through inbound policies.Check my previous post if you want to learn about APIM and client certificates authentication/authorization.
The third option is using OAuth 2.0. With Auth 2.0, the authorization is done in the inbound policy by validating the provided JWT token. Please check this post to learn more about OAuth 2.0 and different types of flows.
APIM and authorization code flow
For this scenario, we are going to use two .NET core applications:
- Client web application - we will log in to this web application using OpenID, and access the Todo APIs using an access token. You can download the source code of the application here
- Todo APIs - Web APIs with no built-in protection, exposed via Azure APIM, and protected with OAuth 2.0. I will use the hosted version of the APIs at https://tosokr-todo-api.azurewebsites.net If you want, you can download the code from my Github repository and run it locally or host it somewhere else ({your_todo_api}).
As we learned in the OAuth 2.0 authorization code flow section (from the previous post), we need to register our application and API in Azure AD. We will start with the Todo API:
- In Azure AD, open App Registrations
- Select “New registration”
- Under the name, enter Todo API. Select “Accounts in this organizational directory only” for Supported account types and leave Redirect URI empty (because we do not perform authentication from the API, just authorization). Click on “Register”
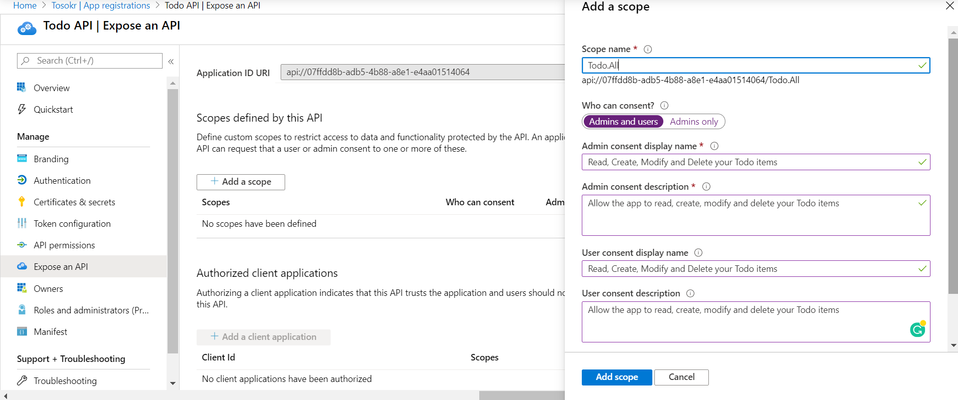
- Expose an API by adding a scope like in the picture below. Under “Who can consent?”, choose Admin and users (consent is the process of a user granting authorization to an application to access protected resources on their behalf. An admin or user can be asked for consent to allow access to their organization/individual data). In our example, it is OK to enable the user to consent to this application. After creation, copy your scope URI ({your_scope_uri}) and the Application ID URI ({your_application_id_uri})
Next, register the client application:
- In Azure AD, open App Registrations
- Select “New registration”
- Under the name, enter Client API. Select “Accounts in this organizational directory only” for Supported account types and leave Redirect URI empty (we will add in the next steps). Click on “Register”
- Copy the values for Application (client) ID ({your_client_id}) and Directory (tenant) ID ({your_tenant_id}), because we will need those later when we will configure the application
- Select authentication from the sidebar, and click on Add a platform. Select Web and, if you are going to run the application locally, enter the Redirect URIs (I stands for Identifier) and Logout URLs (L stands for Locator). If you are going to host the application somewhere, enter your URI/Ls. Note that we are enabling the implicit grant for ID tokens because we are using a .NET Core Web Application (as stated in the description).
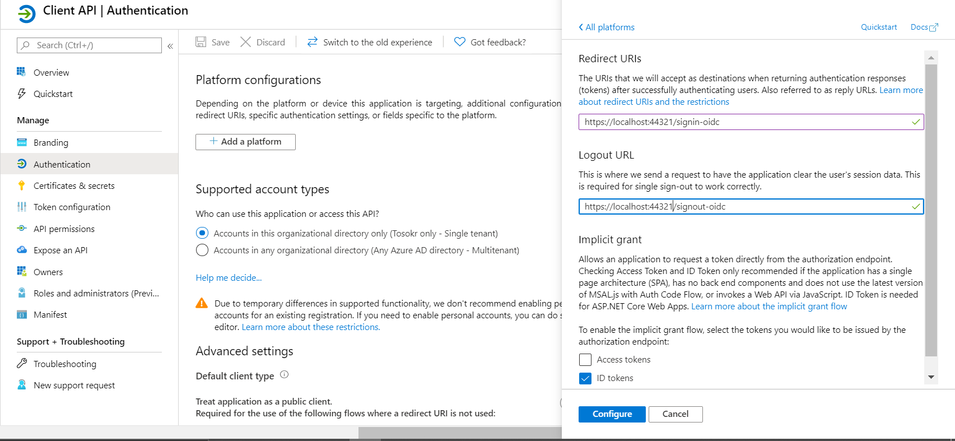
- Add the https://localhost:44321 (if running the application locally) URI under Redirect URIs. If you are going to run the .NET Core application using Visual Studio Code, also add https://127.0.0.1:44321 and https://127.0.0.1:44321/signin-oidc into the list of URIs.
- Select Certificates & Secrets and create a new client secret ({your_client_secret}). Copy the value after the creation, because otherwise, you will not be able to see it again.
Next, we need to publish the Todo API in the APIM instance. For simple import, I included a Swagger into the project. You can view it here
- Open your API Management service, and under API Management select APIs
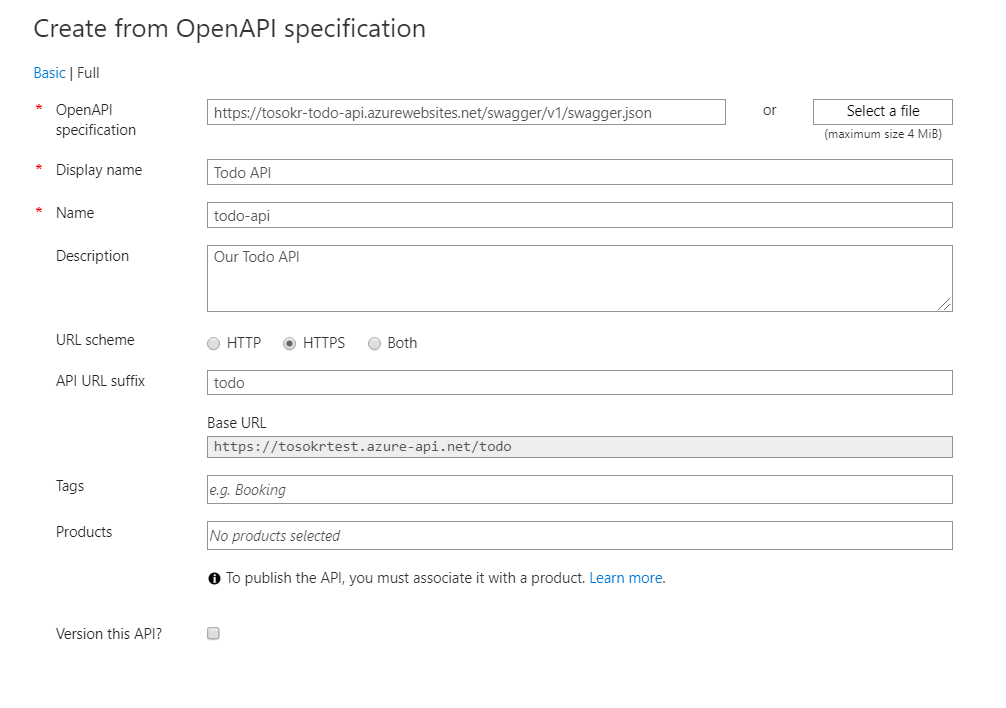
- In Add a new API window, select OpenAPI
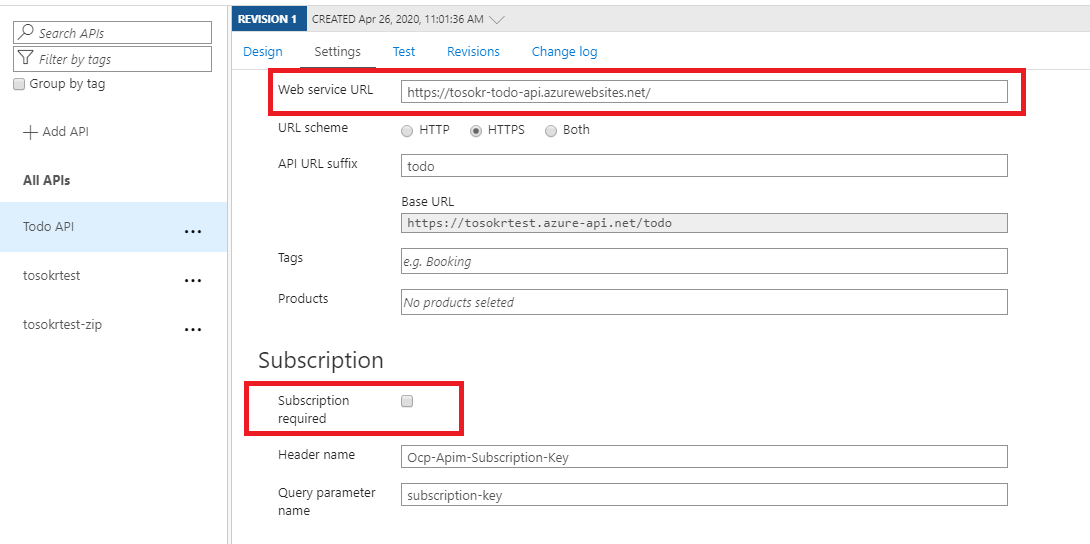
- Fill in the details like in the picture (if you are hosting the Todo API, change the url for the OpenAPI specification) an click Create
- In the Settings tab of the Todo API, enter the Web Service URL (our backend Todo API), and disable subscription requirement (we are doing a demo)
- Click on the Todo API, select All operations and open the policy code editor. Copy the xml code bellow, replace the {variables} with your values set in the previous steps, and save it:
 <policies>
 <inbound>
     <base />
     <validate-jwt header-name="Authorization" failed-validation-httpcode="401"
     failed-validation-error-message="Unauthorized. Access token is missing or invalid."
     require-scheme="Bearer">
         <!-- Against which server to do the vaildation -->
         <openid-config url="https://login.microsoftonline.com/{your_tenant_id}/v2.0/.well-known/openid-configuration" />
         <audiences>
             <!-- The provided token is intended for the Todo API -->
             <audience>{your_application_id_uri}</audience>
         </audiences>
         <issuers>
             <!-- List of acceptable issuers of the token -->
             <issuer>https://login.microsoftonline.com/{your_tenant_id}/v2.0</issuer>
             <issuer>https://sts.windows.net/{your_tenant_id}/</issuer>
         </issuers>
         <required-claims>
             <!-- Scope of the token (operation that is allowed) -->
             <claim name="scp" match="all">
                 <value>Todo.All</value>
             </claim>
             <!-- Application that is forwarding the token -->
             <claim name="appid" match="all">
                 <value>{your_client_id}</value>
             </claim>
         </required-claims>
     </validate-jwt>
     <set-header name="Authorization" exists-action="delete" />
 </inbound>
 <backend>
     <base />
 </backend>
 <outbound>
     <base />
 </outbound>
 </policies>
We can easily extend the access token, by including a groups claim. After the extension, in the APIM policy we can configure authorization based on group membership, by adding the groups claim. Follow this link to learn more how to add the optional claims into the token.
Now, if we test the API, we will get a “401 Unauthorized. Access token is missing or invalid.” error because the API now requests a valid Bearer token in the Authorization header.
Clone the repository of the client web application, open the appsetings.json file, overwrite with the content from below and fill in the details for your deployment:
 {
 "AzureAd": {
     "Instance": "https://login.microsoftonline.com/",
     "Domain": "[Enter the domain of your tenant, e.g. contoso.onmicrosoft.com]",
     "TenantId": "{your_tenant_id}",
     "ClientId": "{your_client_id}",
     "CallbackPath": "/signin-oidc",
     "SignedOutCallbackPath ": "/signout-callback-oidc",

     // To call an API
     "ClientSecret": "{your_client_secret}"
 },
 "TodoList": {
     /*
     TodoListScope is the scope of the  API you want to call.
     */
     "TodoListScope": "{your_scope_uri}",
     "TodoListBaseAddress": "https://{your_apim_instance_name}.azure-api.net/todo"

 },
 "Logging": {
     "LogLevel": {
     "Default": "Information",
     "Microsoft": "Warning",
     "Microsoft.Hosting.Lifetime": "Information"
     }
 },
 "AllowedHosts": "*"
 }
To run the application, we need .NET Core 3.1. To run the application locally, in the root folder of the application, execute:
dotnet runNavigate to https://localhost:44321, accept the invalid certificate, and login with a user from your Azure Active Directory tenant. After the successful login, you will get the following message to give the application permission to access your data:
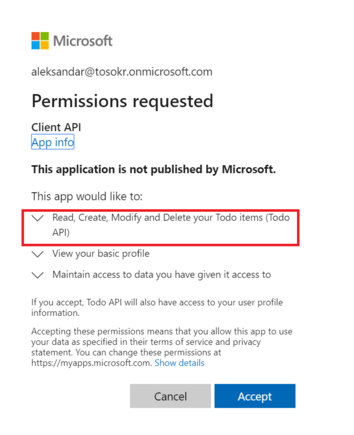
After you click on Accept, in the top menu (click Accept if a message is displayed) select TodoList. If authorization is successful, you will see the Todo page where you can create, edit, and delete items from the Todo list. If you see an error, then debug because you now know how the OAuth 2.0 works :)
APIM and client credentials flow
For this scenario, we will also use two .NET core applications:
- Client daemon application - console application that will use its credentials to get an access token for authorization at Todo APIs. You can download the source code of the application here
- Todo APIs (same as in the authorization code flow example) - Web APIs with no built-in protection, exposed via Azure APIM, and protected with OAuth 2.0. I will use the hosted version of the APIs at https://tosokr-todo-api.azurewebsites.net If you want, you can download the code from my Github repository and run it locally or host it somewhere else ({your_todo_api}).
First, we will register the Todo API in Azure AD. The registration differs from the one in the authorization code flow example (we need to modify the Manifest file):
- In Azure AD, open App Registrations
- Select “New registration”
- Under the name, enter Todo API Client Credentials Flow. Select “Accounts in this organizational directory only” for Supported account types and leave Redirect URI empty (because we do not perform authentication from the API, just authorization). Click on “Register”
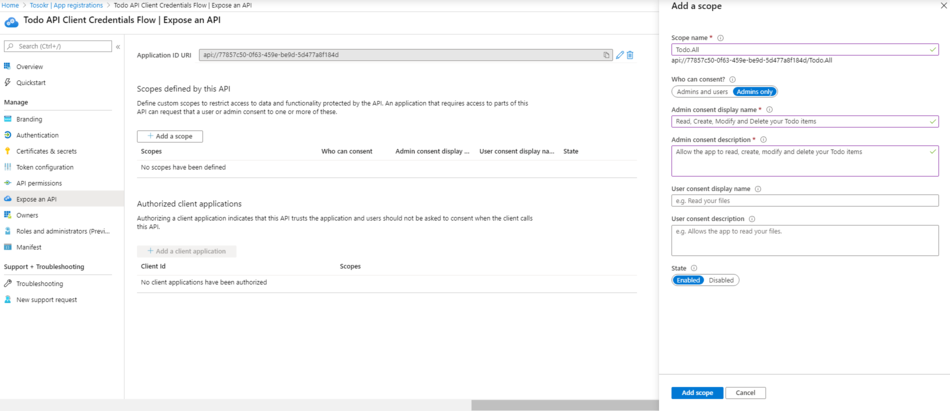
- Expose an API by adding a scope like in the picture below. After creation, copy your scope URI ({your_scope_uri}) and the Application ID URI ({your_application_id_uri})
- From the sidemenu, open the Manifest, and chage the appRoles json definitions to:
"appRoles": [
     {
         "allowedMemberTypes": [
             "Application"
         ],
         "description": "Daemon apps in this role can consume the web api.",
         "displayName": "DaemonAppRole",
         "id": "7489c77e-0f34-4fe9-bf84-0ce8b74a03c4",
         "isEnabled": true,
         "lang": null,
         "origin": "Application",
         "value": "DaemonAppRole"
     }
 ],
Next, we will register the client daemon application:
- In Azure AD, open App Registrations
- Select “New registration”
- Under the name, enter Client Daemon Application. Select “Accounts in this organizational directory only” for Supported account types and leave Redirect URI empty. Click on “Register”
- Copy the values for Application (client) ID ({your_client_id}) and Directory (tenant) ID ({your_tenant_id}), because we will need those later when we will configure the application
- Select Certificates & Secrets and create a new client secret ({your_client_secret}). Copy the value after the creation, because otherwise, you will not be able to see it again (to improve the security, use a certificate instead of a secret).
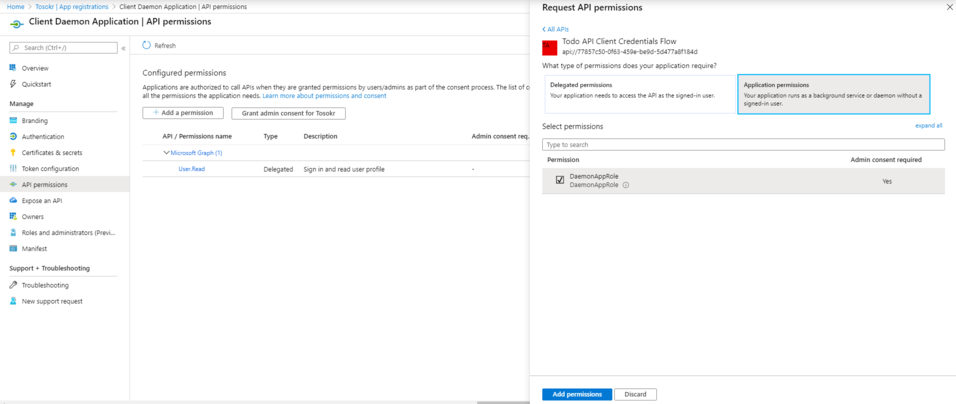
- For the application to be able to access the API, we need to add the permission to the previously published API. Notice, we are adding application permission, not a delegated permission
- Because the application runs as a daemon, it can’t display any consent for us to allow access. For this reason, as a tenant admin, we will grant consent for the requested permissions for all account in the tenant by clicking on the button “Grant admin consent for “
In the APIM policy we created for the authorization code flow, we checked for a scp (scope) claim. If we want to reuse the existing published API, we will need to remove that validation because the Bearer token for the client cridentials flow contains roles (from the Manifest we edited before) instead of scope. Because of that, we will publish againt the Todo API, now using different path.
- Open your API Management service, and under API Management select APIs
- In Add a new API window, select OpenAPI
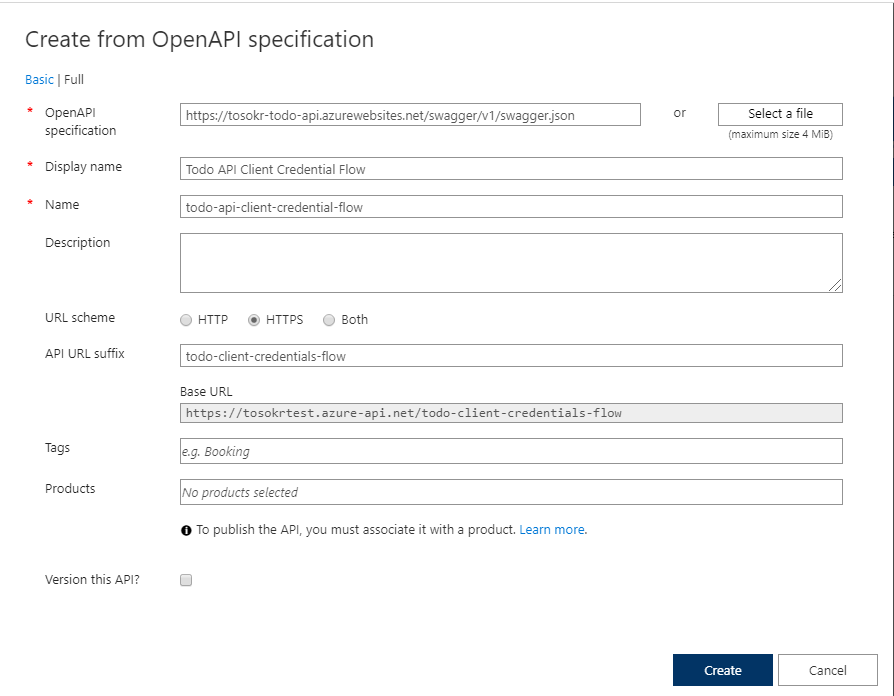
- Fill in the details like in the picture (if you are hosting the Todo API, change the url for the OpenAPI specification) an click Create
- In the Settings tab of the Todo API Client Credentials Flow, enter the Web Service URL (our backend Todo API), and disable subscription requirement (we are doing a demo)
- Click on the Todo API Client Credentials Flow, select All operations and open the policy code editor. Copy the xml code bellow, replace the {variables} with your values set in the previous steps, and save it:
 <policies>
 <inbound>
     <base />
     <validate-jwt header-name="Authorization" failed-validation-httpcode="401"
     failed-validation-error-message="Unauthorized. Access token is missing or invalid."
     require-scheme="Bearer">
         <!-- Against which server to do the vaildation -->
         <openid-config url="https://login.microsoftonline.com/{your_tenant_id}/v2.0/.well-known/openid-configuration" />
         <audiences>
             <!-- The provided token is intended for the Todo API -->
             <audience>{your_application_id_uri}</audience>
         </audiences>
         <issuers>
             <!-- List of acceptable issuers of the token -->
             <issuer>https://login.microsoftonline.com/{your_tenant_id}/v2.0</issuer>
             <issuer>https://sts.windows.net/{your_tenant_id}/</issuer>
         </issuers>
         <required-claims>
             <!-- Roles the application has -->
             <claim name="roles" match="all">
                     <value>DaemonAppRole</value>
             </claim>
             <!-- Application that is forwarding the token -->
             <claim name="appid" match="all">
                 <value>{your_client_id}</value>
             </claim>
         </required-claims>
     </validate-jwt>
     <set-header name="Authorization" exists-action="delete" />
 </inbound>
 <backend>
     <base />
 </backend>
 <outbound>
     <base />
 </outbound>
 </policies>
Clone the repository of the client daemon application, open the appsetings.json file, overwrite with the content from below and fill in the details for your deployment:
 {
     "Instance": "https://login.microsoftonline.com/{0}",
     "Tenant": "[Enter the domain of your tenant, e.g. contoso.onmicrosoft.com]",
     "ClientId": "{your_client_id}",
     "ClientSecret": "{your_client_secret}",
     "CertificateName": "[Or instead of client secret: Enter here the name of a certificate (from the user cert store) as registered with your application]",
     "TodoListBaseAddress": "https://{your_apim_instance_name}.azure-api.net/todo/todo-client-credentials-flow",
     "TodoListScope": "{your_application_id_uri}.default"
 }
To run the application, you need .NET Core 3.1. To run the application locally, in the root folder of the application, execute:
dotnet runIf sucessfull, you will see an output like this:
 Token acquired

 Web Api result:

 id = 1
 title = Pick up groceries
 owner = Mr.Brown

 id = 2
 title = Finish invoice report
 owner = Mr.Yellow

 Press any key to exit
Summary
OAuth 2.0 authorization at API Management gateway is an excellent solution if you:
- want to introduce modern authorization for your legacy APIs
- offload the authorization logic from you APIs
- enable the use of external Identity and Access Management solution (for example Azure Active Directory) for your fully private APIs
Make us of authorization code flow if you are building a website where your users will log on with their Azure AD accounts and you want to authorize the access on a user level. For all other scenarios, use client credentials flow.
Note: In Azure Portal, in the sidebar of API Management Service, under Security, you can see OAuth 2.0 and OpenID Connect options. Those are just for the developer portal, and you don’t need to configure those if you are not using the portal. The same applies to the user authorization option in the settings for the API – it is just to tell the developer portal that needs to supply an access token to use that API. It is not clear in the official Microsoft documentation, but the Consumption tier supports OAuth 2.0. Same as above, the documentation refers to the developer portal (because there is no developer portal in Consumption tier).